Butterfly Tattoo Cover Up Ideas: Turn Old Ink Into Something You Love

Before and after tattoo cover up: faded forearm tattoo transformed into a black and grey butterfly

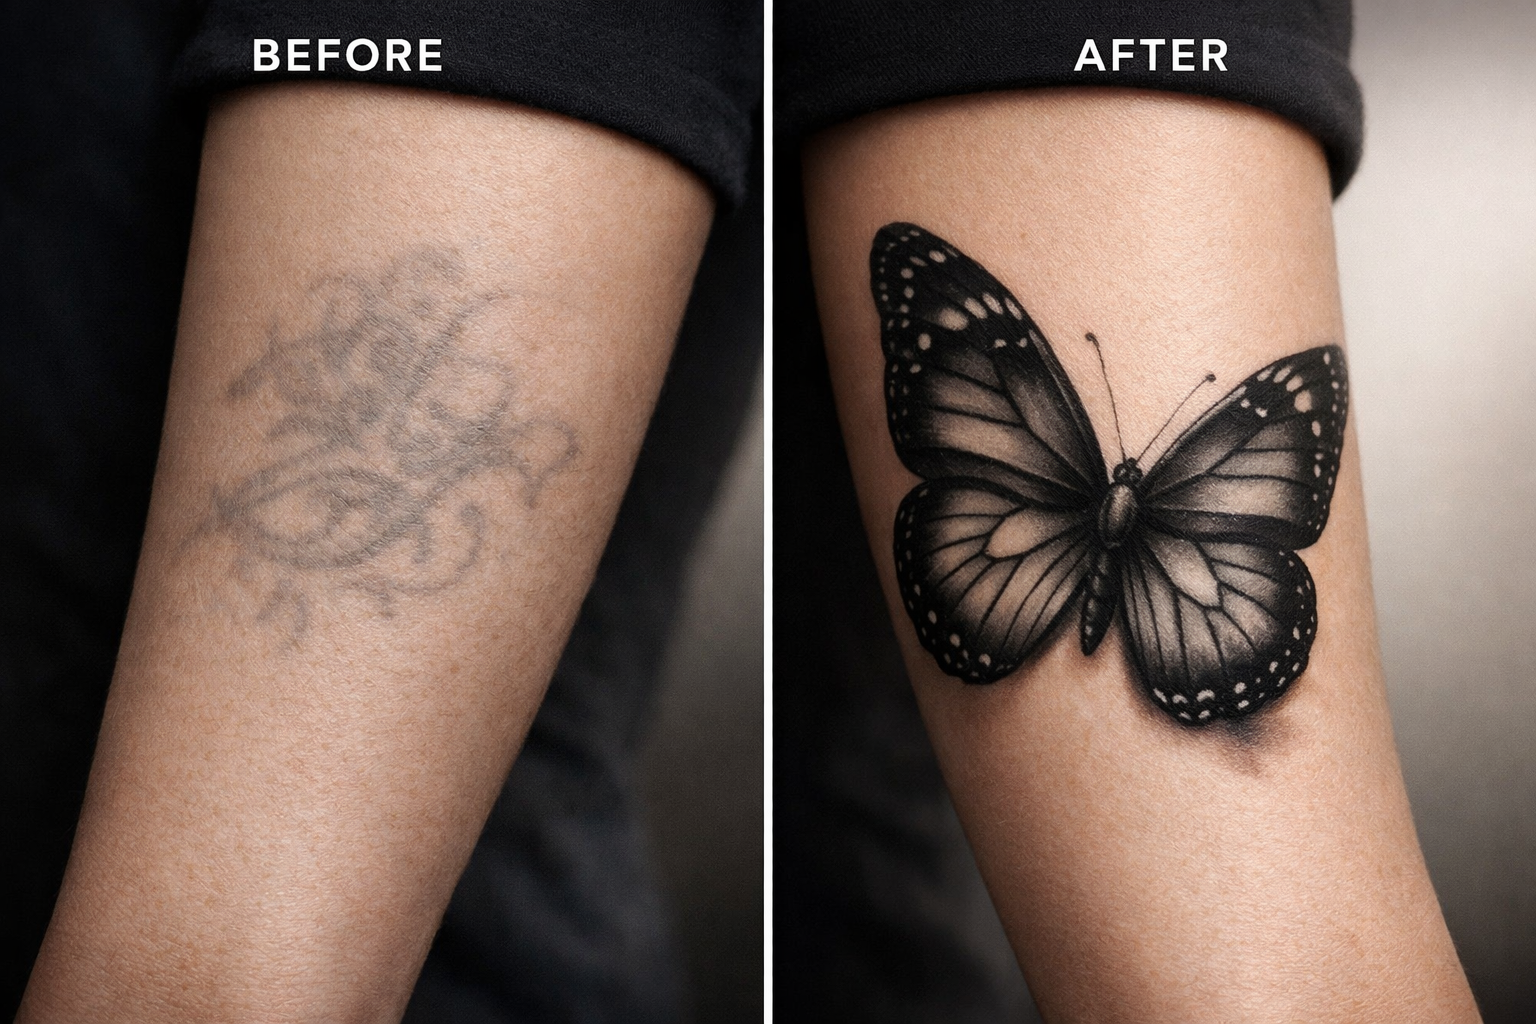
A butterfly tattoo cover up works because the design naturally creates the thing most cover-ups need: layers. Wings can carry soft gradients, high-contrast edges, and detailed texture—exactly what helps distract the eye from what’s underneath.

This guide is for people who already have an older tattoo (or a tattoo they regret) and want to rework it into a butterfly piece that feels intentional, modern, and wearable.

Quick take (5-bullet summary)

  • A butterfly tattoo can be a strong cover-up choice because wings allow shading and texture to hide old lines.

  • The darker and bolder your old tattoo is, the more you’ll likely need size, contrast, and strategic placement.

  • Black & grey realism and realism are often the best styles for hiding old ink cleanly.

  • The best cover-ups start with a good consult: clear photos, honest details, and realistic expectations.

  • Aftercare matters even more with cover-ups—healing well keeps the new design crisp and unified.


What a butterfly tattoo cover up is (and why butterflies work)

A cover-up doesn’t “erase” the old tattoo—it rebuilds the visual story so the new design becomes what your eye reads first.

Butterflies are especially effective because:

  • Wing symmetry helps re-balance awkward shapes

  • Gradient shading can soften old harsh lines

  • Texture and pattern (veins, scales, stippling) can camouflage underlying ink

  • Background elements (smoke, florals, soft shadows) can extend coverage without looking forced

If you’re here for symbolism instead of cover-ups, use this as your guide: butterfly tattoo meaning (linked here) — and come back when you’re ready to rework old ink.


What can a butterfly cover up?

Cover-ups depend on what you’re covering:

Easier to cover

  • Thin linework

  • Faded ink

  • Small symbols

  • Light script

Harder to cover (still possible, but needs strategy)

  • Dense black areas

  • Heavy tribal / thick outlines

  • Large saturated color

  • Old scars or raised texture (requires a careful consult and may not be suitable for everyone)

If you’re not sure which category yours falls into, a consult is the fastest way to get a real answer.


10 butterfly tattoo cover-up design strategies (that look intentional)

  1. Single large butterfly with layered shading
    Best when the old tattoo sits in one area (like a small cluster or name).
    Tattoo transformation from script to butterfly tattoo by Inknation Studio NYC.realism-tattoo-arm

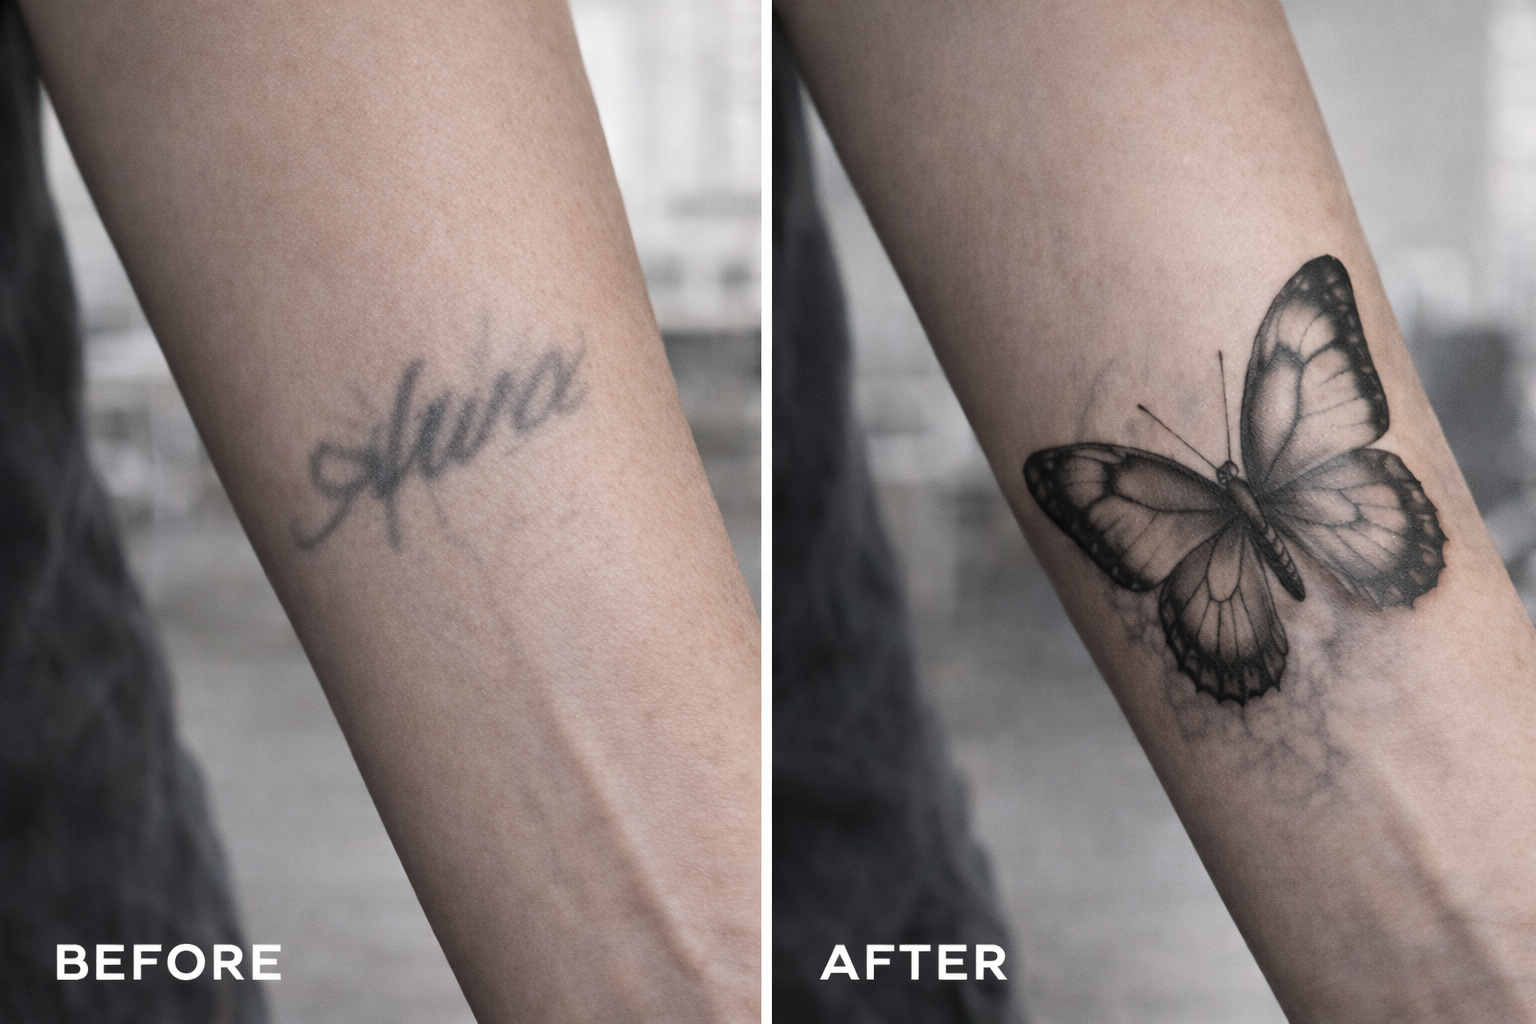
  2. Two butterflies (one “hero,” one supporting)
    Great when you need coverage across a wider shape without making one butterfly oversized.

    Before and after of a shoulder tattoo cover-up: a faded anchor tattoo replaced by a large, hyper-realistic black and grey butterfly with smoky shading.

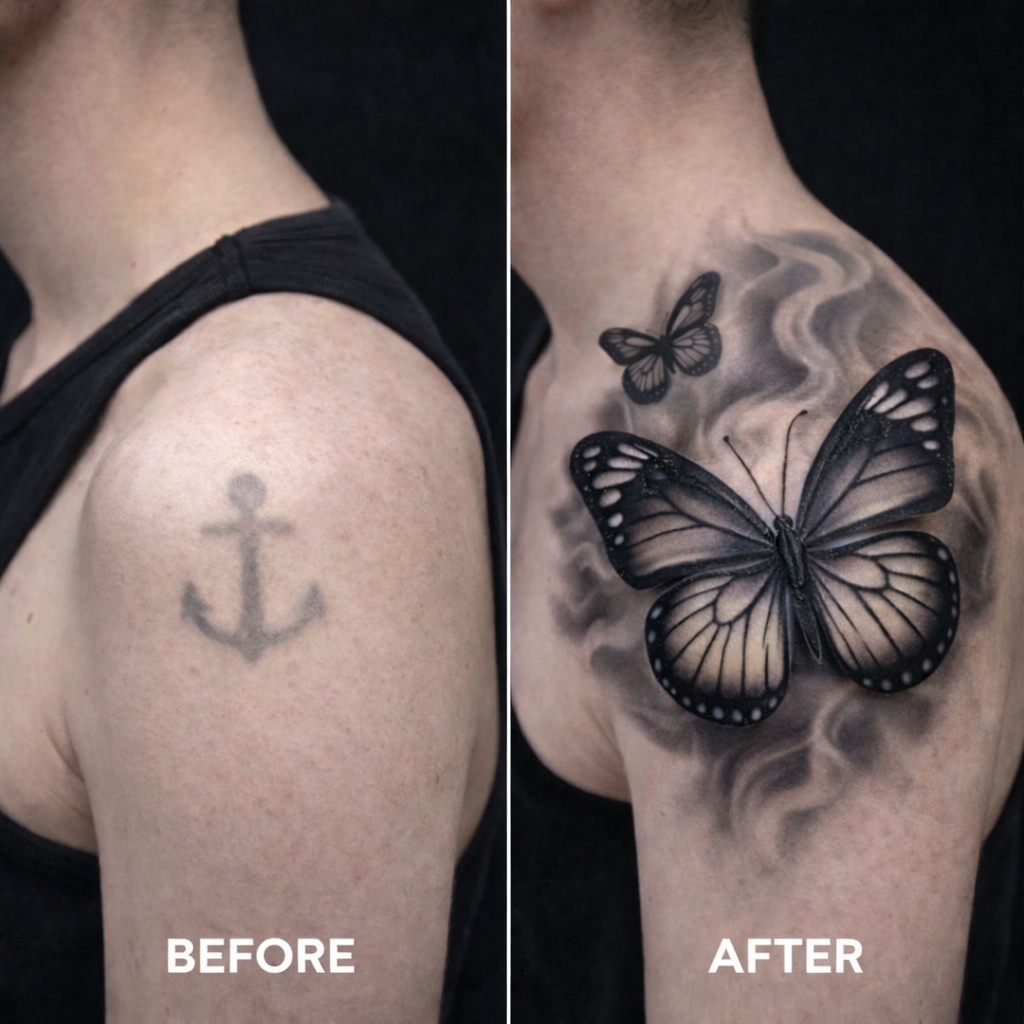
  3. Butterfly + floral cover-up (peony, rose, cherry blossom)
    Flowers add natural coverage and soft transitions around the old tattoo.

    Before and after of a floral tattoo cover-up: faded simple flowers replaced by a vibrant, realistic monarch butterfly and detailed pink roses

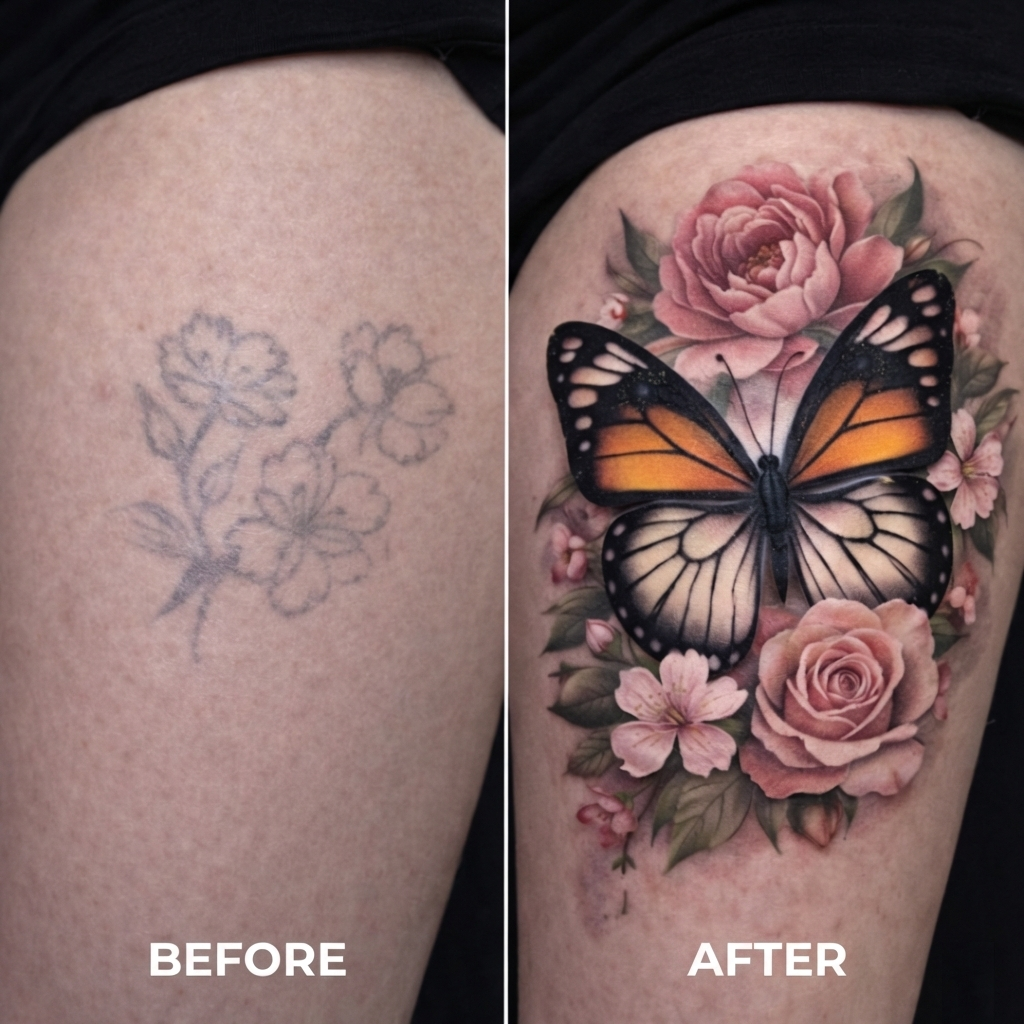
  4. Black & grey realism butterfly
    One of the most effective approaches for hiding older ink with depth and shadow.

    Before and after of a leg tattoo cover-up: a faded black yin-yang symbol replaced by a highly detailed striped butterfly resting on a large peony flower in black and grey realism

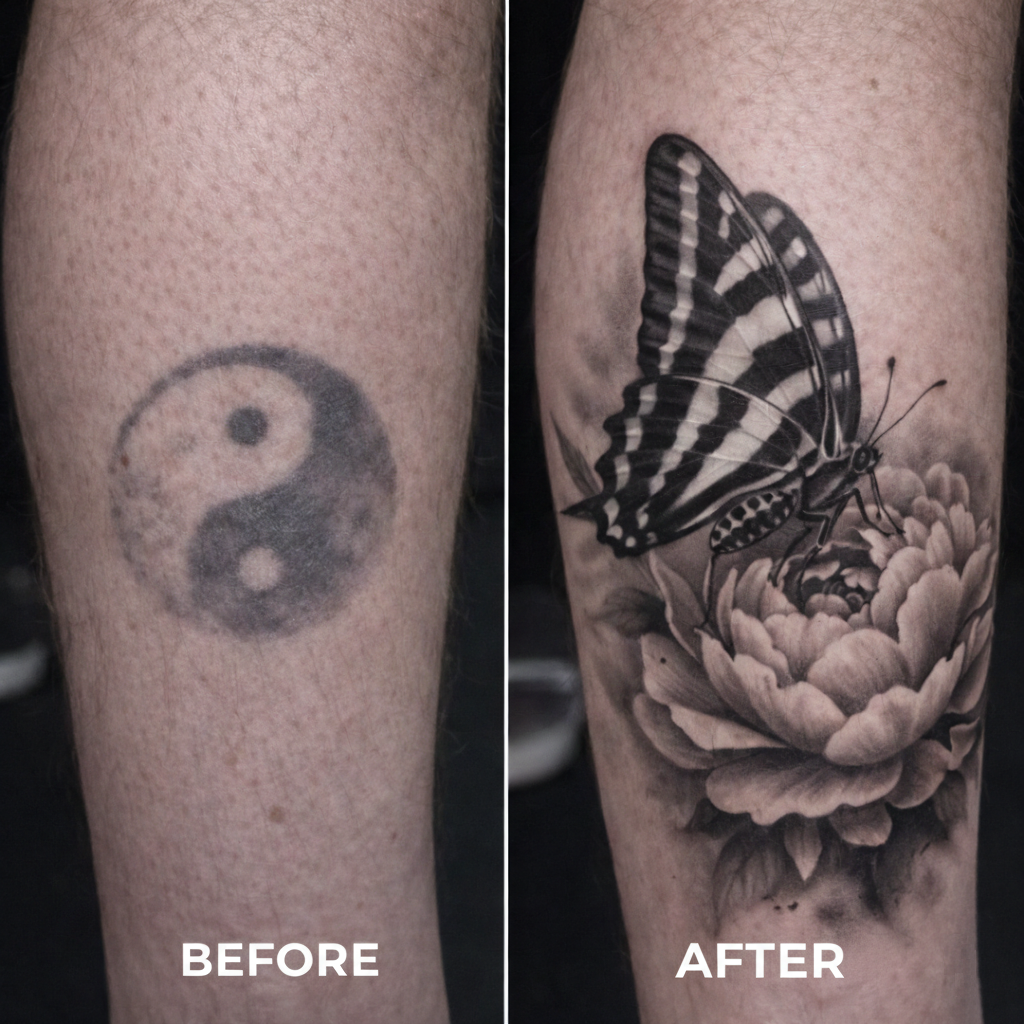
  5. Butterfly wing close-up (macro style)
    Works when the old tattoo has uneven geometry—macro wings let you control attention.

    Before and after of a shoulder tattoo cover-up: an old black tribal tattoo covered by a large realistic black and grey butterfly with 3D effects.

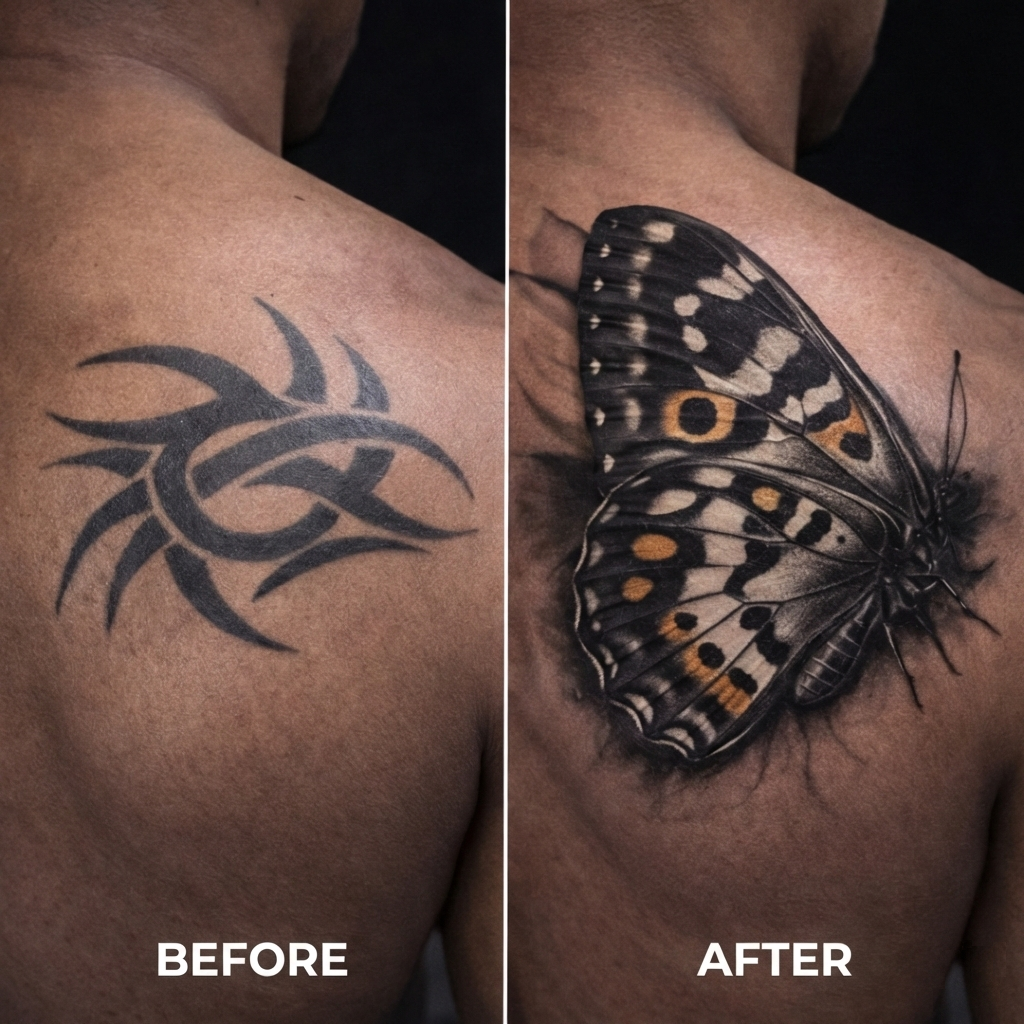
  6. Butterfly with smoky background / soft shadow
    Ideal for older tattoos that “peek” at the edges—background can unify the area.

    Before and after of an arm tattoo cover-up: a light, faded rose outline replaced by a vibrant orange and black butterfly over a dark, cracked-earth background.

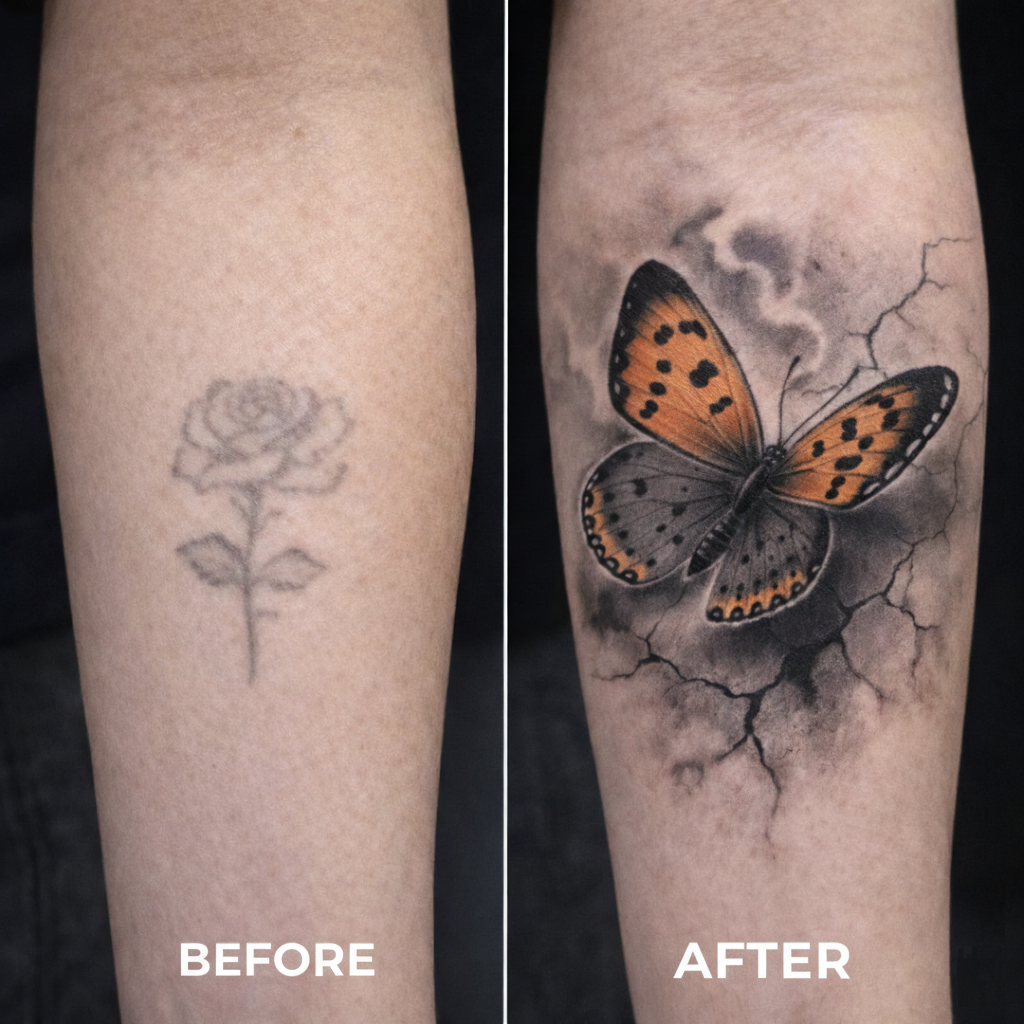
  7. Neo-traditional butterfly with bold outline + solid shading
    Good for covering bold old linework because it fights “like with like.”

    Before and after of an ankle tattoo cover-up: a small red rose replaced by a vibrant traditional-style butterfly with orange, blue, and yellow wings.

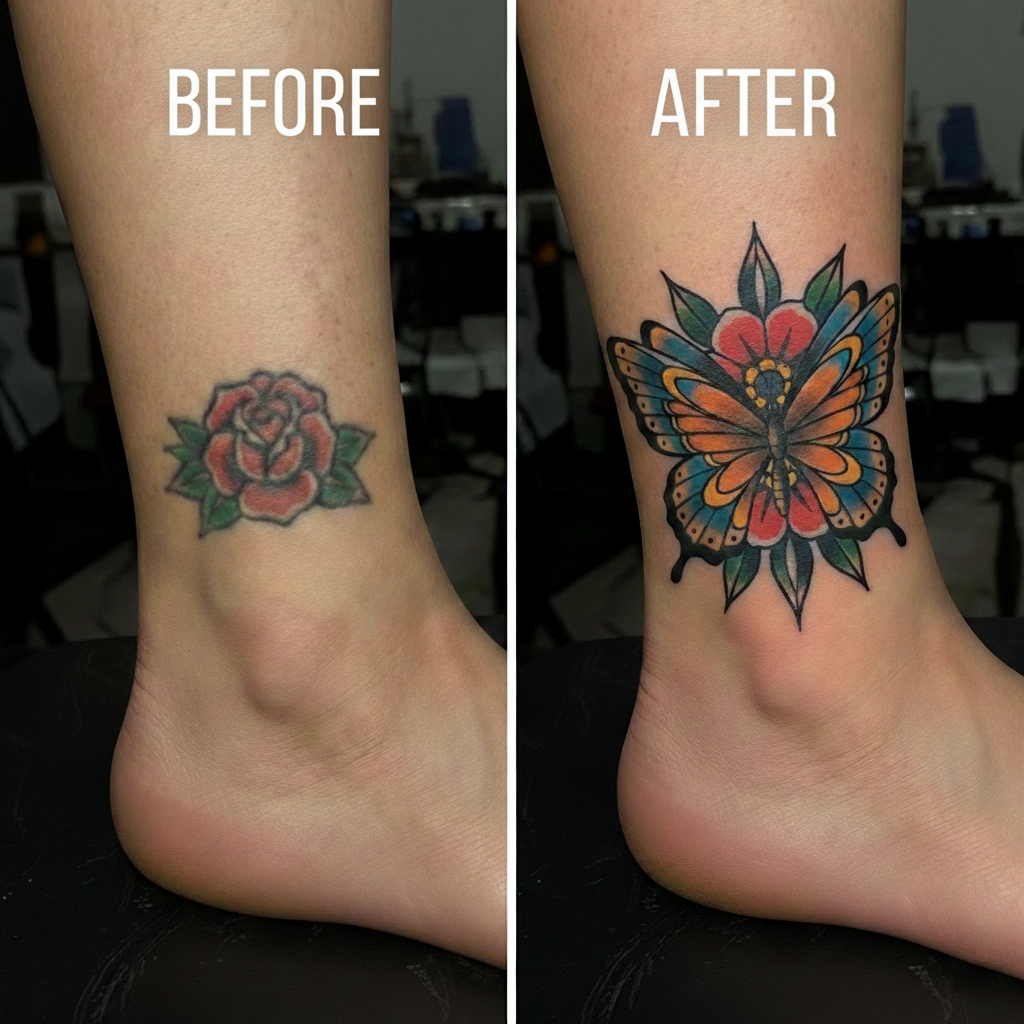
  8. Butterfly + ornamental frame
    A frame (filigree/mandala-style) can disguise odd borders and make it look designed.

    Before and after of an arm tattoo cover-up: two orange koi fish replaced by a traditional butterfly centered within a black ornamental frame.

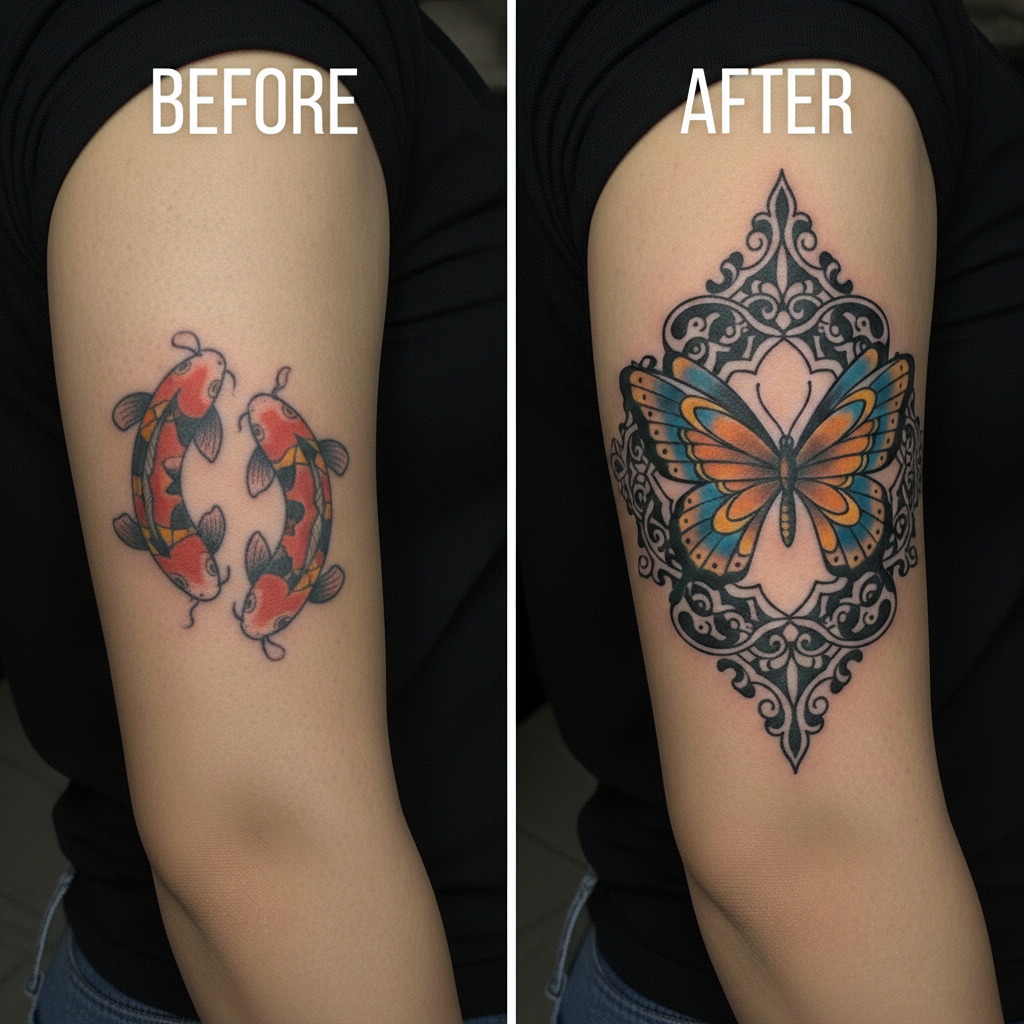
  9. Butterfly + geometric shapes
    Sharp geometry can hide awkward old angles while the butterfly stays the focal point.

    Before and after of a back tattoo cover-up: small geometric triangle outlines replaced by a large, blackwork butterfly integrated with dark geometric patterns.

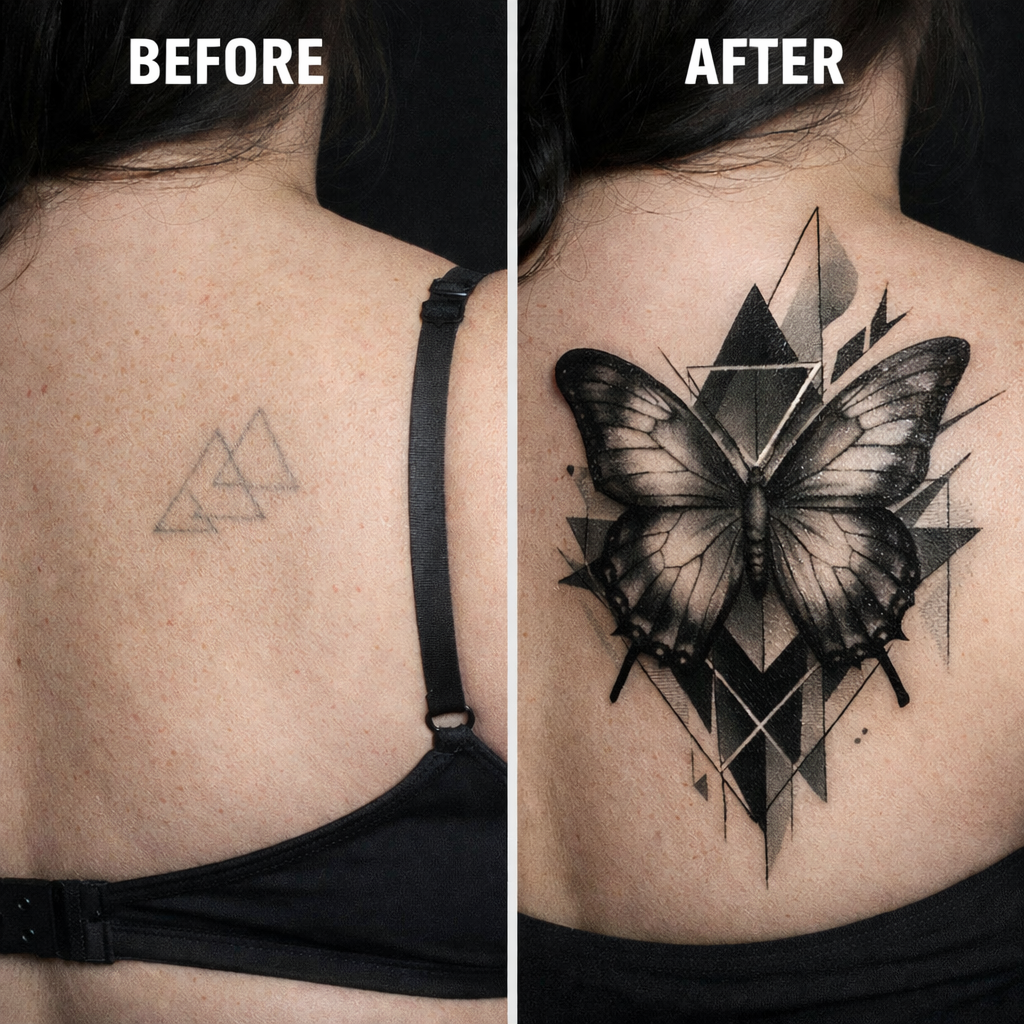
  10. Butterfly “flight trail” (small to larger butterflies)
    Helps cover elongated shapes and makes the composition feel dynamic.

    Before and after of a leg tattoo cover-up: four faded bird silhouettes replaced by five realistic black and grey butterflies with smoke-like background shading.


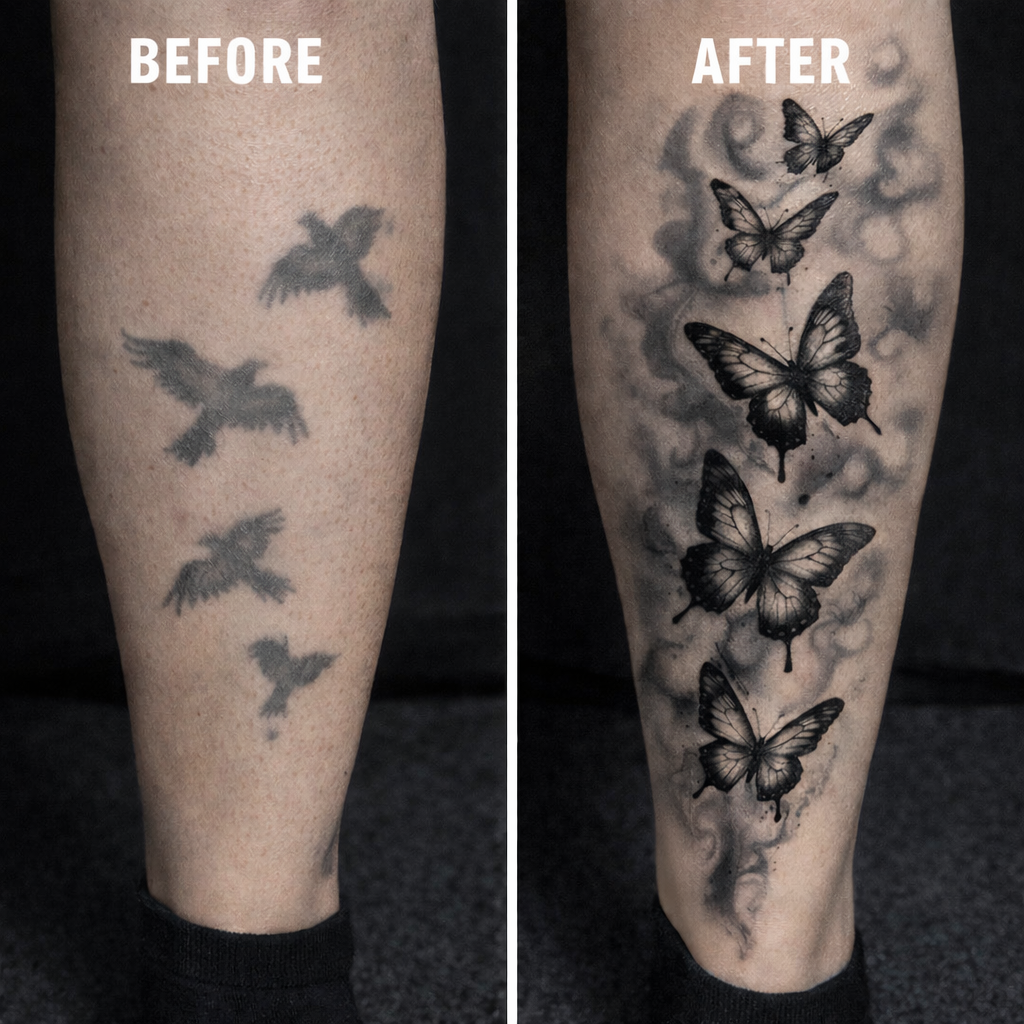
Styles that hide old ink best

If your goal is “I don’t want to see the old tattoo anymore,” these styles are usually strongest:

  • Black & Grey Realism: high control with contrast and shading

  • Realism: lifelike texture that naturally distracts from what’s underneath

  • Illustrative / Neo-traditional: bold structure that can overpower old linework

Want to explore style references before you book?


How to prep for a cover-up consultation (bring this checklist)

To get the best plan quickly:

  • A clear photo in natural light (no filters)

  • Approximate age of the tattoo (newer ink behaves differently than older ink)

  • Any previous rework attempts

  • What you hate about it (shape, placement, style, meaning)

  • What you want instead (vibe, style, size range, color vs black & grey)

  • 3–5 inspiration references (what you like and what you don’t)


What to expect (timeline)

1) Consultation and feasibility

Your artist will assess darkness, size, and placement—and tell you what’s realistic.

2) Concept + strategy

This is where good cover-ups are won: contrast planning, wing placement, and background decisions.

3) Tattoo session (sometimes multiple sessions)

Some cover-ups can be done in one session; others need more time depending on saturation and detail.

4) Healing and aftercare

Aftercare keeps the new design crisp and helps it settle evenly. Use the studio’s aftercare guidance:


Common mistakes with butterfly tattoo cover-ups

  • Choosing a design that’s too small (old ink will show through)

  • Going too light when the old tattoo is dark

  • Not disclosing what’s under there (touch-ups, blown-out lines, prior cover-ups)

  • Over-detailing fine line on top of heavy old ink

  • Skipping the background when you actually need it to unify the cover-up

  • Rushing aftercare (cover-ups need clean healing to look seamless)


FAQ

Can a butterfly tattoo cover up a name?
Often, yes—especially if the script is faded or thin. Size and shading strategy matter.

Do I need laser first?
Not always. Some tattoos cover well as-is; others benefit from lightening first. A consult can tell you quickly.

Will the old tattoo show through?
A good cover-up aims to make the old tattoo unnoticeable, but results depend on ink density, placement, and design choices.

Can a cover-up butterfly be done in fine line?
Sometimes—if the old tattoo is light and small. For darker ink, styles with more shading are usually better.

How big does a butterfly cover-up need to be?
Most cover-ups need to be larger than the original to control attention and coverage.

Can you tattoo over scars?
It depends on the scar type, texture, and how healed it is. A consult is necessary, and not every scar is a good candidate.


Ready to explore a butterfly tattoo cover up in NYC?

Start here (cover-up specialists + examples):
https://inknationstudio.com/tattoo-cover-up-nyc/

Book a consultation:
https://inknationstudio.com/book-now/

Inknation Studio
56 W 45th St, Fl 18, New York, NY 10036, United States
(917) 261-6936
Hours: 11:00 AM – 6:00 PM every day (Mon–Sun)

Healed vs Fresh Realism Tattoos: What to Look For (NYC Guide)

Fresh vs healed comparison of a black and grey Medusa realism tattoo.

Why fresh realism tattoos can be misleading

A fresh tattoo is essentially a controlled wound. In the first days, your skin is irritated and swollen, and the surface can look glossy from ointment making blacks look deeper and edges look sharper than they’ll appear once healed. That “fresh pop” is normal, but it’s not the final result.

Real takeaway: if you’re choosing a realism artist—especially for black & grey realism or micro realism prioritize healed examples over same-day photos.


What “good healed realism” actually looks like (portfolio checklist)

A quick comparison: fresh vs healed

  • Fresh: darker, sharper, sometimes slightly raised; redness can add drama to contrast.

  • Healed: more matte, more natural; fine edges may soften slightly; the “real” contrast range shows up.

Healed realism checklist (use this when browsing portfolios)

Look for these signs in healed photos (4–8+ weeks, ideally months):

  1. Smooth gradients (no banding). Shading transitions should look even—especially in faces, clouds, smoke, and soft backgrounds.

  2. Readable contrast. Dark areas still anchor the piece; highlights and midtones don’t collapse into gray mush.

  3. Crisp-but-natural edges. Realism shouldn’t look like sticker-outline, but key edges should remain controlled.

  4. Detail that stays separated. Hair strands, eyelashes, texture, and small elements shouldn’t merge together.

  5. No obvious blowouts or muddy halos. A little softening is normal; uncontrolled spreading isn’t.

Pro tip: Ask to see fresh + healed of the same tattoo. Comparing both is one of the fastest ways to judge technique.

Black & grey realism: what to look for when healed

  • Skin breaks and highlights still read (not filled in).

  • Dark areas settle into “charcoal depth,” not patchy dark spots.

  • Midtones stay smooth, especially in portraits and realism sleeves.

Micro realism: healed markers (extra caution)

Micro realism can look incredible fresh, but longevity depends heavily on detail spacing, depth control, and placement. When reviewing healed micro realism, pay attention to:

  • Tiny details staying distinct (not blending together).

  • Minimal blur at edges—some softening is normal, but micro detail shouldn’t vanish quickly.

  • Whether the artist shows healed micro realism at all. If there are only fresh photos, treat that as a yellow flag.


Healing timeline: what to expect (realistic stages)

Every body is different, but this is a helpful baseline:

  • Days 1–3: redness, warmth, swelling; tattoo looks bold and shiny.

  • Days 3–10: peeling/flaking; it can look patchy or dull in spots.

  • Weeks 2–4: “cloudy” or muted phase as a new surface layer settles.

  • Weeks 4–8: the tattoo looks more even and “true” to how it will read day-to-day.

Important: If you’re evaluating realism quality, don’t judge your tattoo at day 5. Wait until it’s meaningfully settled.

Infographic explaining fresh vs healed realism tattoos, what to expect while healing, and consultation questions (NYC guide).
Fresh vs healed realism tattoos: healing timeline + healed-quality checklist (NYC).

Common mistakes that hurt healed results (NYC lifestyle edition)

These are frequent issues that can sabotage realism clarity:

  • Over-moisturizing. Too much product can keep skin soggy and slow healing.

  • Picking flakes/scabs. This can pull pigment and create uneven areas.

  • Soaking too soon. Baths, pools, hot tubs, and long showers can be rough early on.

  • Friction + sweat. Tight sleeves, backpacks, gym compression gear, and constant rubbing can irritate the area. (Yes, NYC commutes count.)

  • Sun exposure after healing. UV is one of the biggest enemies of contrast long-term—especially for black & grey realism.

For a full step-by-step routine, link out to InkNation Studio’s aftercare guide:
https://inknationstudio.com/everything-you-need-to-know-about-tattoo-aftercare/

Health note: If you’re worried about abnormal symptoms (spreading redness, fever, severe swelling, worsening pain), contact a medical professional.


What to ask in a realism consultation (copy/paste)

Bring these questions to your consultation—especially for portraits, black & grey realism, or micro realism:

  1. Do you have healed photos of similar work (same style + similar placement)?

  2. What will likely soften most after healing in my design—and how do you plan for it?

  3. How will you build contrast so it stays readable long-term?

  4. What placement will help detail hold up best (movement/friction/skin texture)?

  5. What’s your recommended aftercare approach—and when do you prefer clients to contact you?

  6. If a small touch-up is needed after healing, what’s the best process to plan it?

Then: book the consult and bring 3–5 reference images that match the healed look you want.


FAQs

How long until my realism tattoo looks “fully healed”?
Surface healing is often around a few weeks, but many tattoos look more “true” after additional settling.

Will my realism tattoo get lighter after healing?
Some softening is normal. A good realism artist designs with the healed result in mind (contrast + transitions that survive settling).

What matters more: fresh photos or healed photos?
Healed photos—because they show how the tattoo performs after the skin recovers.


Book a realism consultation in Midtown Manhattan (InkNation Studio)

If you want realism done with the healed result in mind, book a consultation with InkNation Studio in Midtown Manhattan.

InkNation Studio
56 W 45th St, Fl 18, New York, NY 10036
(917) 261-6936
Open 11am–6pm (Mon–Sun)
Book: https://inknationstudio.com/book-now/

Blending Tradition and Innovation: How Realism Transforms Tattoo Lettering

WhatsApp Image 2024 07 24 at 11.18.04 tattoo by Inknation Studio NYC.realism-tattoo-arm

Tattoo lettering has come a long way from its traditional roots. Initially, tattoo lettering was all about simplicity, with straightforward designs often inspired by classic fonts. However, as the art of tattooing has evolved, so too has the complexity and creativity behind lettering tattoo designs. Today, lettering tattoos are not just about words; they have become intricate pieces of art that can stand alone or blend seamlessly with other styles, such as realism, to create unique and versatile masterpieces.
73178205 435093130769395 5482222582462298445 n tattoo by Inknation Studio NYC.realism-tattoo-arm

The fusion of tattoo lettering with realism tattoo is a perfect example of this evolution. Traditional tattoo lettering fonts were often bold and straightforward, but modern artists have taken these basics and elevated them by integrating realistic elements. This combination allows for a more personalized and expressive piece. For instance, a name or phrase rendered in a black and grey realism tattoo style can be intertwined with realistic roses or other natural elements, adding depth and context to the text.
 368673098 6535637973187345 2688175929422357108 n tattoo by Inknation Studio NYC.realism-tattoo-arm

This blend of styles is not limited to just black and grey. Color realism tattoos have also found their place in the world of lettering. Imagine a vibrant, colorful bird perched on a beautifully scripted name or phrase. This approach not only makes the lettering tattoo stand out but also adds a layer of meaning and aesthetic appeal that pure lettering alone might not achieve. The use of color and realism in these designs makes them more dynamic and visually engaging.
381006957 18386099695012899 6882803058365397043 n tattoo by Inknation Studio NYC.realism-tattoo-arm 286335730 843227176554088 2667717743494742658 n tattoo by Inknation Studio NYC.realism-tattoo-arm

The versatility of lettering tattoo designs is another reason for their popularity. They can be tailored to suit any style or preference, whether it’s a minimalist approach with clean, sharp lines or a more elaborate design featuring intricate patterns and realistic elements. This adaptability makes lettering tattoos suitable for a wide range of clients, from those seeking a small, meaningful piece to those looking for a larger, more complex design.
257659890 480091173716866 1706552134772627999 n tattoo by Inknation Studio NYC.realism-tattoo-arm

In conclusion, the evolution of tattoo lettering has opened up new avenues for creativity and personalization in the tattoo world. By fusing traditional tattoo lettering fonts with the detailed and lifelike elements of realism tattoos, artists can create pieces that are both unique and versatile. Whether in black and grey or vibrant color, these designs offer endless possibilities for expression. As the art of tattooing continues to evolve, it’s exciting to imagine the future innovations in lettering tattoo and how artists will continue to push the boundaries of what’s possible.