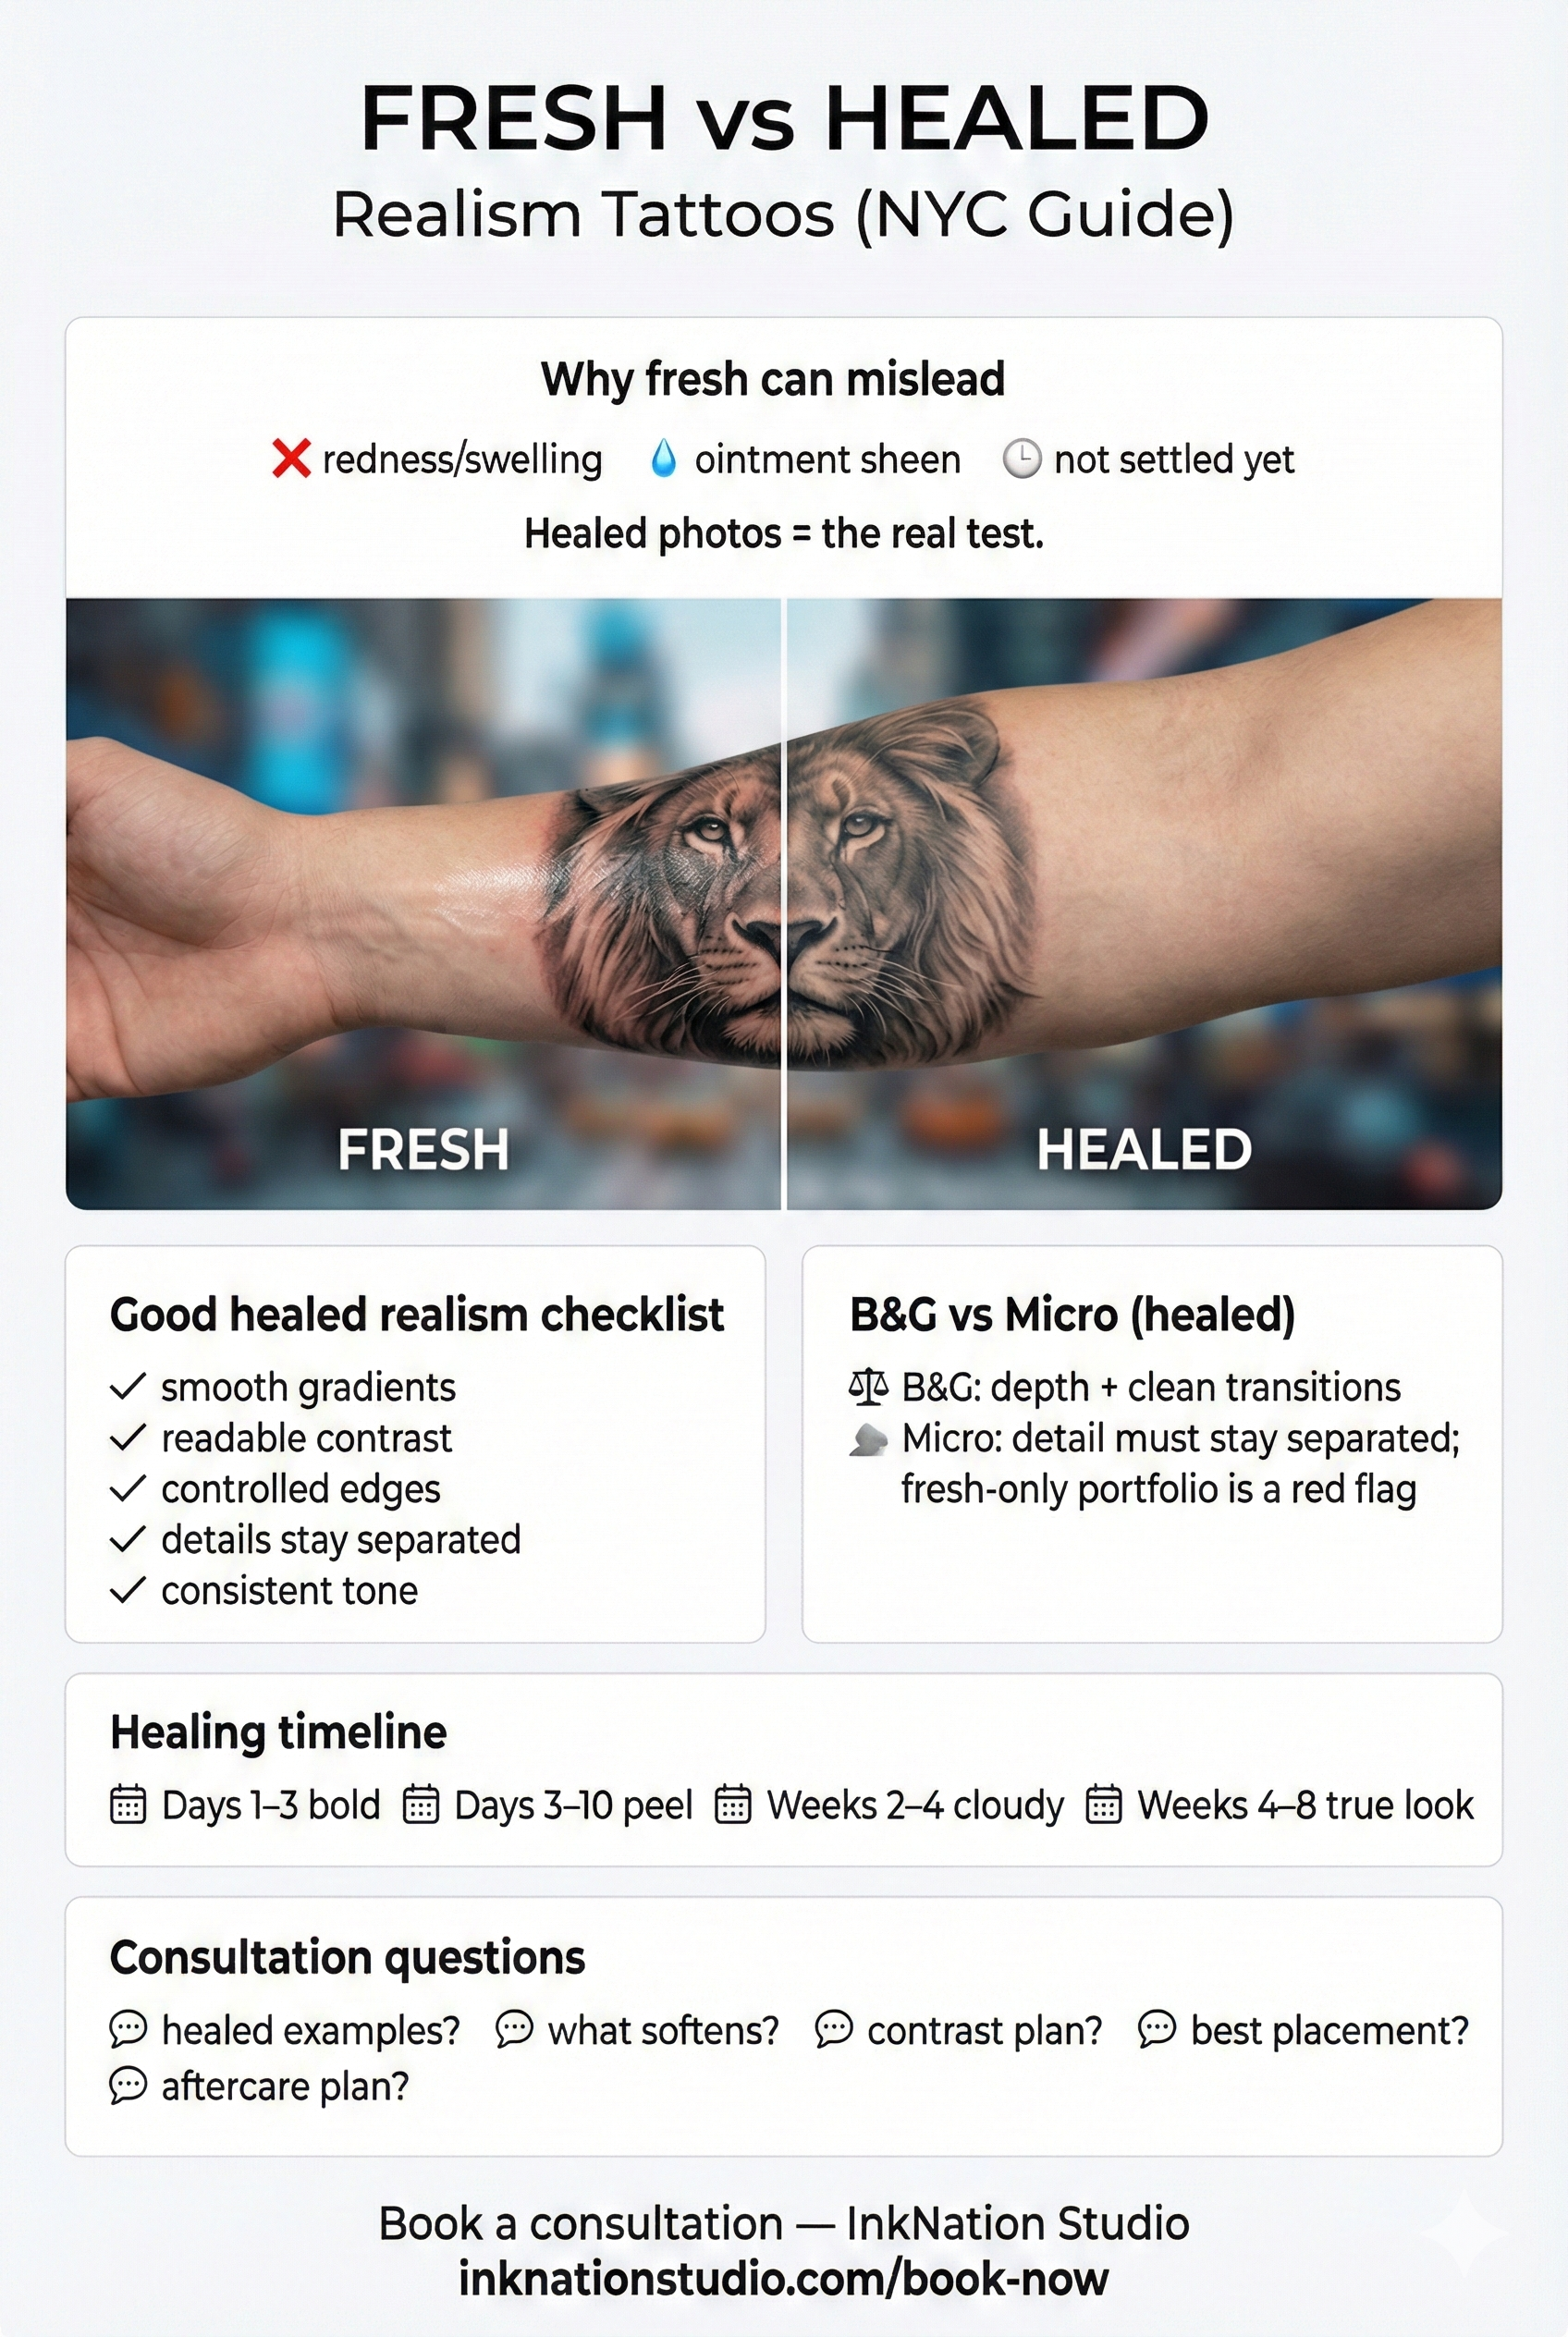
Why fresh realism tattoos can be misleading
A fresh tattoo is essentially a controlled wound. In the first days, your skin is irritated and swollen, and the surface can look glossy from ointment making blacks look deeper and edges look sharper than they’ll appear once healed. That “fresh pop” is normal, but it’s not the final result.
Real takeaway: if you’re choosing a realism artist—especially for black & grey realism or micro realism prioritize healed examples over same-day photos.
What “good healed realism” actually looks like (portfolio checklist)
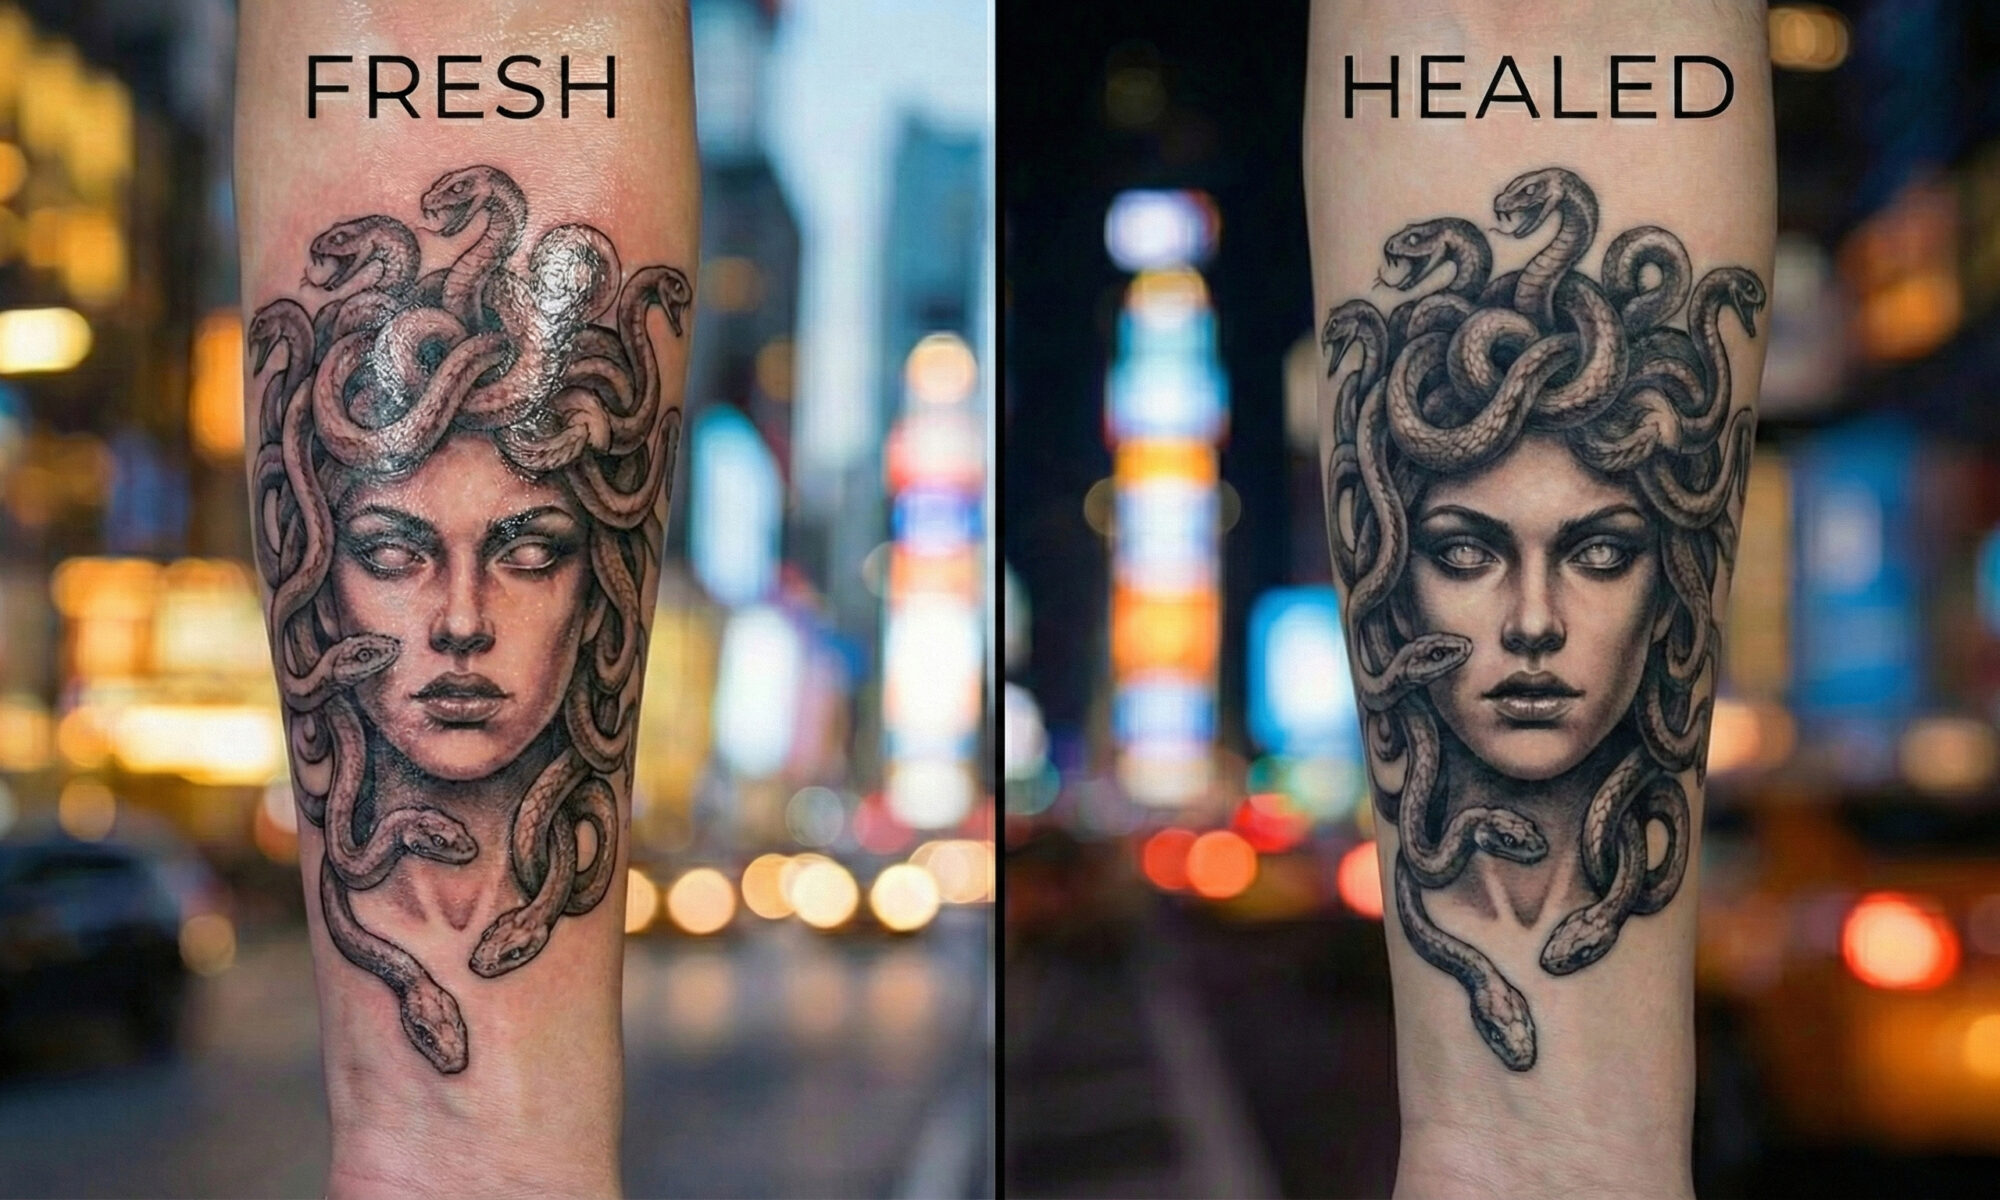
A quick comparison: fresh vs healed
Fresh: darker, sharper, sometimes slightly raised; redness can add drama to contrast.
Healed: more matte, more natural; fine edges may soften slightly; the “real” contrast range shows up.
Healed realism checklist (use this when browsing portfolios)
Look for these signs in healed photos (4–8+ weeks, ideally months):
Smooth gradients (no banding). Shading transitions should look even—especially in faces, clouds, smoke, and soft backgrounds.
Readable contrast. Dark areas still anchor the piece; highlights and midtones don’t collapse into gray mush.
Crisp-but-natural edges. Realism shouldn’t look like sticker-outline, but key edges should remain controlled.
Detail that stays separated. Hair strands, eyelashes, texture, and small elements shouldn’t merge together.
No obvious blowouts or muddy halos. A little softening is normal; uncontrolled spreading isn’t.
Pro tip: Ask to see fresh + healed of the same tattoo. Comparing both is one of the fastest ways to judge technique.
Black & grey realism: what to look for when healed
Skin breaks and highlights still read (not filled in).
Dark areas settle into “charcoal depth,” not patchy dark spots.
Midtones stay smooth, especially in portraits and realism sleeves.
Micro realism: healed markers (extra caution)
Micro realism can look incredible fresh, but longevity depends heavily on detail spacing, depth control, and placement. When reviewing healed micro realism, pay attention to:
Tiny details staying distinct (not blending together).
Minimal blur at edges—some softening is normal, but micro detail shouldn’t vanish quickly.
Whether the artist shows healed micro realism at all. If there are only fresh photos, treat that as a yellow flag.
Healing timeline: what to expect (realistic stages)
Every body is different, but this is a helpful baseline:
Days 1–3: redness, warmth, swelling; tattoo looks bold and shiny.
Days 3–10: peeling/flaking; it can look patchy or dull in spots.
Weeks 2–4: “cloudy” or muted phase as a new surface layer settles.
Weeks 4–8: the tattoo looks more even and “true” to how it will read day-to-day.
Important: If you’re evaluating realism quality, don’t judge your tattoo at day 5. Wait until it’s meaningfully settled.
Common mistakes that hurt healed results (NYC lifestyle edition)
These are frequent issues that can sabotage realism clarity:
Over-moisturizing. Too much product can keep skin soggy and slow healing.
Picking flakes/scabs. This can pull pigment and create uneven areas.
Soaking too soon. Baths, pools, hot tubs, and long showers can be rough early on.
Friction + sweat. Tight sleeves, backpacks, gym compression gear, and constant rubbing can irritate the area. (Yes, NYC commutes count.)
Sun exposure after healing. UV is one of the biggest enemies of contrast long-term—especially for black & grey realism.
For a full step-by-step routine, link out to InkNation Studio’s aftercare guide:
https://inknationstudio.com/everything-you-need-to-know-about-tattoo-aftercare/
Health note: If you’re worried about abnormal symptoms (spreading redness, fever, severe swelling, worsening pain), contact a medical professional.
What to ask in a realism consultation (copy/paste)
Bring these questions to your consultation—especially for portraits, black & grey realism, or micro realism:
Do you have healed photos of similar work (same style + similar placement)?
What will likely soften most after healing in my design—and how do you plan for it?
How will you build contrast so it stays readable long-term?
What placement will help detail hold up best (movement/friction/skin texture)?
What’s your recommended aftercare approach—and when do you prefer clients to contact you?
If a small touch-up is needed after healing, what’s the best process to plan it?
Then: book the consult and bring 3–5 reference images that match the healed look you want.
FAQs
How long until my realism tattoo looks “fully healed”?
Surface healing is often around a few weeks, but many tattoos look more “true” after additional settling.
Will my realism tattoo get lighter after healing?
Some softening is normal. A good realism artist designs with the healed result in mind (contrast + transitions that survive settling).
What matters more: fresh photos or healed photos?
Healed photos—because they show how the tattoo performs after the skin recovers.
Book a realism consultation in Midtown Manhattan (InkNation Studio)
If you want realism done with the healed result in mind, book a consultation with InkNation Studio in Midtown Manhattan.
InkNation Studio
56 W 45th St, Fl 18, New York, NY 10036
(917) 261-6936
Open 11am–6pm (Mon–Sun)
Book: https://inknationstudio.com/book-now/